Windows
When I try to install HELI-X I get a warning form Defender that the app is prevented from starting.
When you get the following warning, press more info.
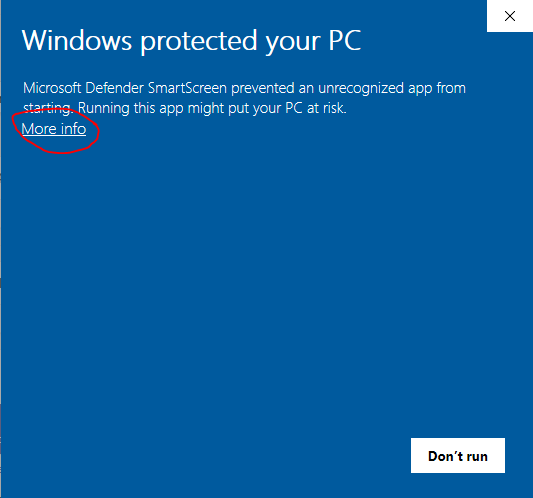
When you get the next screen, press"Run anyway".
HELI-X does not start. There is an error message concerning OpenAL.
Make sure that there is a playback device activated on your computer.

The controller did work in Windows 7, but with Windows 10 it is not recognized by the operating system..
You can try do edit the registry. Look here.
Mac OS-X
HELI-X does not start
On Sequoia and Toahoe, HELI-X 11 might not start, because it is not considered to be a signed app. You can resolve this by typing this command in a terminal:
xattr -cr /Applications/HELI-X11.app
You can also watch this video:
https://youtu.be/nIup8gZQIxw
On Mac OS-X I cannot open the dmg file, thus the installation fails
This might be due to the safety protection system on your computer. Google for a solution: https://www.google.com/search?q=problems+opening+installer+dmg+os-x
I want to remove HELI-X completely on Mac OS-X
You remove HELI-X in two steps:
1. Move the App from the application folder in the trash.
2. Open your personal libraray folder (Home/Library) and remove the HELI-Xx folder from there.
Note that on Mac OS-X the personal library folder is often hidden. Google how to make it visible (which deends on the version of your OS (make user library folder visible on OS-X ...)
I cannot use the menus.
On Mac-OS it is not possible to get information about the screen size at the beginning of HELI-X. Thus, there is the small program at the start which asks for the mouse factor. When the menu can not be used inside HELI-X, start the program again and try another mouse factor. "2" is then a good guess, if "1" does not work.
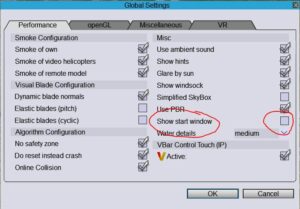
How can I get rid of the screen which asks for the mouse factor?
When HELI-X works as expceted and you can use the menus, you do not need the screen which asks for the mouse factor anymore. You can switch it off in the global settings.
Linux
On Linux, I get an error message during the start of HELI-X.
You should use Java with version 8 or 11. On Ubuntu, you might use
sudo apt install openjdk-8-jdk
and check it with java -version
The controller does not work with linux
Please make sure that the user is member of the group "input"
Controller
I connected my transmitter with an interface. But the switches are not recognized by HELI-X.
- Program your transmitter so that the switches are associated to channels, e.g. landing flaps, retractable gear, and so on.
- During the calibration of the transmitter in HELI-X do the following: When you were asked to move the sticks to their endpoints, also move the switches.
- Then your switches can be associated with functions in HELI-X in the "Buttons" section
My controller is recognized but it does not work.
It is likely that you did not go through the complete calibration process:
- Choose Configuration->Controller and press Sticks.

- Next follow the instructions through the whole process and press Next to move to the next step.

- Note that the bars do not move until you stepped to the next step.
- At the end, leave the setup with "OK". The save button is only needed, when you want to store different configurations, e.g., when you fly helicopter with mode 2 and planes with mode 1.

What does cyclic nick or cyclic roll and pitch mean?
Well, these are words from the helicopter control. The correspondences to the terms of planes are:
cyclic nick - elevator
cyclic roll - aileron
cyclic pitch - trust
rudder - rudder
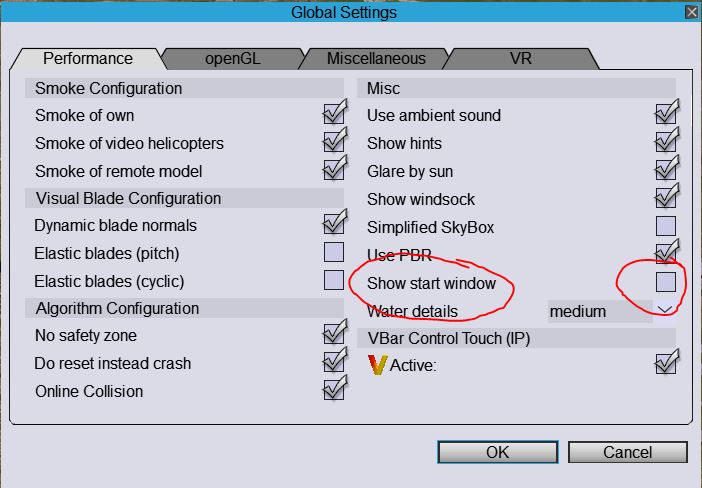
How should a VBar controller be configured for HELI-X?
Up to Version 9.0, the buttons should be configured like this:
 For version greater 9.0 (where three banks are available) the buttons should be configured like this:
For version greater 9.0 (where three banks are available) the buttons should be configured like this:
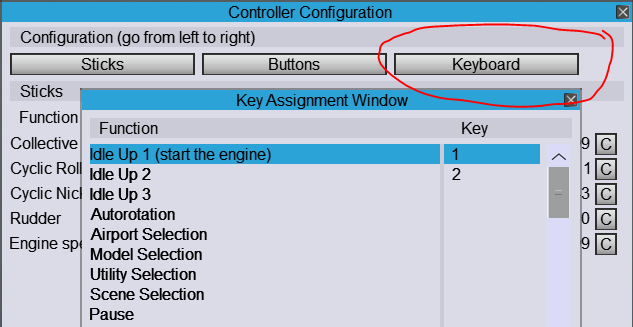
I want to assign Idle Up 1/2 to the transmitter, but I get the message that it is not allowed to assign the flight phases both on the controller and the keyboard.
In this case please delete the keyboard assignments for Idle Up 1 and 2 in the keyboard configuration (press DEL).
Which steps do I have to do to use the VBar Control Touch as controller via WLAN?
- Update VBC Touch radio (Transmitter Setup >> App Updater). Let the automatic "Checking File Integrity" process complete, and then press "Start Update". Let Update finish.
- Install and activate the "Sim via Wifi" app. (Transmitter Setup >> Shop >> System)
- Make sure you use Version 9.1 or later.
- Activate VBC Touch (IP) on Heli-X. (Configuration >> Global Settings >> Input System >> check the box). Then you have to restart Heli-X
- Activate "Send UDP Control" on VBC Touch (Techtalk >> IP UDP Simulator >> check "Send UPD Control" box). This last step has to be performed every time you want to connect the VBC Touch wirelessly to Heli-X via Wifi.
- To end the wireless connection session, press "End Session" on the VBC Touch radio
I have intermittent connection when using the WLAN with the VBarControl Touch.
Go to transmitter settings on the VBarControl Touch.
- Uncheck the cloud service
- Uncheck the online service.
The stick display (or the Stick Mover) does not work correctly, e.g. the directions are wrong.
The stick display can be configured independently of the configuration of the controller, i.e., you can fly in Mode 2 and the display is in Mode 1.
You can select Mode 1-4 of the display directly or start the configuration process.
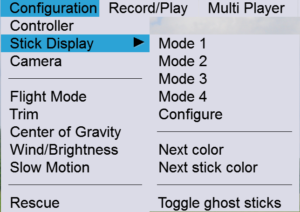

What do I need to know about the stick display?
For the use of the stick display, you have to understand the following:
- The stick display is switched on/off in the HUDs menu (show sticks)
- You can switch the appearance of the stick display by using Configuration (Stick display) "Next color" and "Next stick color"
- The mode of the stick display is chosen independently from the controller. Configuration (Stick display), Mode 1-4 or Configuration
- The stick display follows the model with the current focus.
The RX2Sim is recognized but it does not work
For reasons I do not know, I have - after connecting the device or after reboot - to press the mode several times until the blue light is on again. Then restart HELI-X.
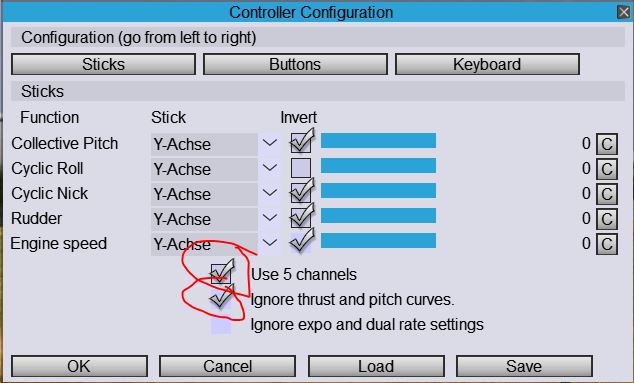
I want to use the pitch and thrust curves of my transmitter.
This is not recommended, better configure your transmitter to change the banks in HELI-X.
If you nevertheless want to configure this:

- Make sure that your interface transmits 5 or more channels.
- During calibration, manage it to transmit the pitch and thrust channel separately so that the min and max value are properly set.
- In the controller configuration, select "use 5 channels" and "ignore thrust and pitch curves"
- And then you have to assign the channels manual to the functions.
Is there a video how to setup the controller?
Yes. Look here: https://www.heli-x.info/cms/setting-up-the-controller/
Virtual Reality VR
How do I start HELI-X in VR mode?
To start HElI-X in VR node, first install SteamVR. Make sure your glasses work with Steam VR. Then use the Icon HELI-X 10 VR to start.
I get an error message that VR can not be started.
Sometimes the VR glasses are not ready as devices. In this case, stop SteamVR, restart it and try again. It might also help, to reboot your PC.
I cannot access the menus in VR mode.
The menu system of HELI-X is also available in VR mode. For this, the mouse is used. Be careful: the mouse positions for VR are measured in the mirror window (title bar HELI-X ...). Make sure that the mirror window is as large as possible and the no other window is above, so that mouse position can be seen.
How can I increase the resolution in VR mode.
The quality of HELI-X can be adapted with several ways. The recommended way is to increase the quality in the settings of your glasses (resolution 2x, 4x and so on).
Secondly you can switch on Anti Aliasing in the global settings VR inside HELI-X. (This needs much resources, though).
Starting from HELI-X 11 you can also use the FXAA filter (global settings, VR).
The standard view points into the wrong direction.
You can use the menu "View" and select "center view". Then the standard view is changed in direction to the current position of the model.
General
I have a strong graphics adapter, but HELI-X I get slight interruptions from time to time.
Check the system settings of your graphics adapter. Deactivate "Thread optimization"
I opened a multiplayer server, but nobody can connect.
If you want to open an multiplayer server for windows, the following preparations are necessary:
- On your router, define a port forwarding for TCP/IP and UDP: You need three sequential ports, e.g. 30000-30002 (TCP) and 30000-30002 (UDP).
- In the Windows firewall go to advanced settings and define two inbound rules, one for TCP/IP and one for UDP. Use the same ports as before.
- When defining the HELI-X server, set the port to the first number from above, that is 30000 in our example.
- If it still does not work, another firewall or virus program might prevent the incoming messages.
The retractable gears do not work.
In HELI-X V8, use the function "Toggle Animation on/off". In V9 and above use the function "Toggle landing gear up/down"
During hover or torque training the model is too near to the pilot.
You can define the position of the training by choosing another start position. In HELI-X V8 use the menu (Shortcuts->Set new start position) to define the actual position as the new start position. In V9 you can also switch from different start positions in the simulation menu.
How can I change the airport of an online session?
The first pilot logged in into the session can select a new airport and the go to the menu Multiplayer->send scene description. Then the airport is changed for all players.
How can I make a movie for youtube, etc.?
You can use the software OBS Studio for this.
From where can I get new models and airports?
Download them within HELI-X from the menu Options->Look for new ...
Fullscreen is not working.
- You have to select in Configuration->Global Options->OpenGL the screen resolution and the framerate to be used in Fullscreen. You may have to try different settings.

- Some older graphics adapters may not be able to display fullscreen.
HELI-X does not start. There is an error message concerning OpenAL.
Make sure that there is a playback device activated on your computer.
The sound does not work correctly. The direction from where the sound comes and its loudness is strange.
Try to install OpenAL.
How can I launch a glider?
You can use the functions "Hand Launch" (also at certain heights) or the function "Increase Height".

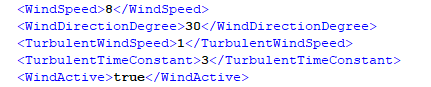
Is there a possibility to add/save wind settings for this airport?
In airports, it is optionally possible to save default wind settings. You can do this by yourself, but you have to edit the xml file of the airport by yourself (use an editor like notepad++ for this). The you can add/edit lines for the wind settings. See the xml file of an airport with wind as example:
Can I make my own scene?
Yes. Locate the scenes folder in the resources directory. And take the available scenes as an example. You may want to use an editor like notepad++ to edit the xml file.
Can I make a scene such that a helicopter is automatically loaded with it?
No, this is not possible. However, note that your last helicopter or plane is loaded automatically when HELI-X is restarted.
I want to update HELI-X, but I get the message "This version is up to date".
The update mechanism inside of HELI-X works only when you stay to the same major version numer, e.g. from 7.0 to 7.1. For a larger update (e.g. 8.0 to 9.0), you typically have to install the new demo version and then actiavate it with your key.
I want to change the direction of the sun light
To change the direction of the sunlight, you have to edit the xml file of the airport. There you can specify the direction vector of the sun light in 0,-1,-0.1
To simplify this process, you can:


- Turn on the status line
- Use the function "Toggle status line"
- Toggle the status line until you see the light direction
- Use the cursor keys to move the sun. When the direction is satisfying, copy the direction into the xml file.
How can I switch between fullscreen and windowed mode with a key?
- Go to the controller configuration and press "keyboard"

- Scroll to "Toggle fullscreen" and press the desired key, e.g. F11
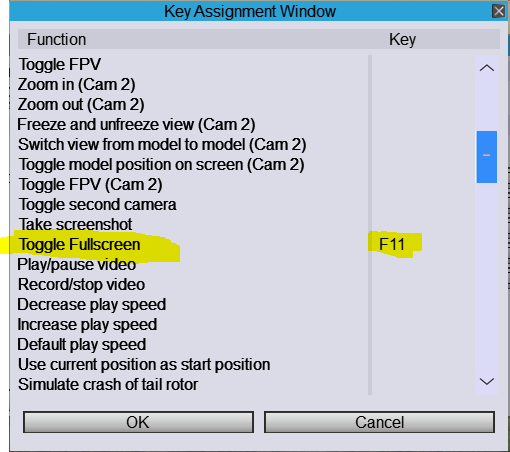
- That is all. Leave with ok, and then you can use the key to switch the display mode.
Is there an FPV option available?
Yes. In order to use the FPV option, you have to use an airport of type Scene3D:
 And you have to switch the camera settings into a FPV mode:

And you have to switch the camera settings into a FPV mode:
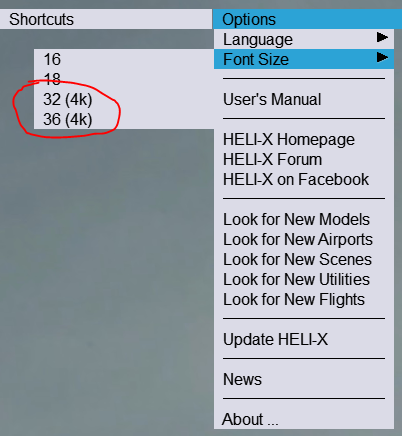
The menu and fonts are so small that I can hardly read anything on my 4k monitor.
You should switch to a larger font (32 or 36 pt).
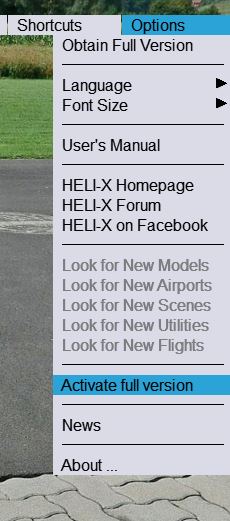
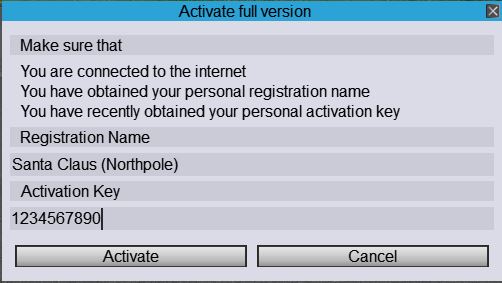
How do I activate the demo version of HELI-X to a full version?
After you have received your activation data, start the demo version, choose Options->Activate full version and then type in your data in the window:
In fullscreen mode, there is no sound anymore.
Make sure to select the correct color depth in the openGL settings (global options).
HELI-X does not run smooth on my system.
If HELI-X does not run smooth, you can consider the following points:
- check if other processes do need too much CPU time, e.g. index processes, virus scan, etc
- Use airports with lower resolution
- Change the OpenGL settings in the global options: reduce the anti aliasing value and/or reduce the value for anisotropic filtering
- Choose an airport without crash objects.